這個程式碼是修改自以前的練習
但是讓Gemini用模組化的方式整理
表單架構如下
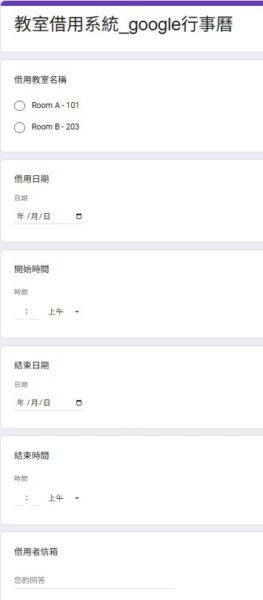
由於表單的日期、時間是2種類型,所以要分開來設計題目
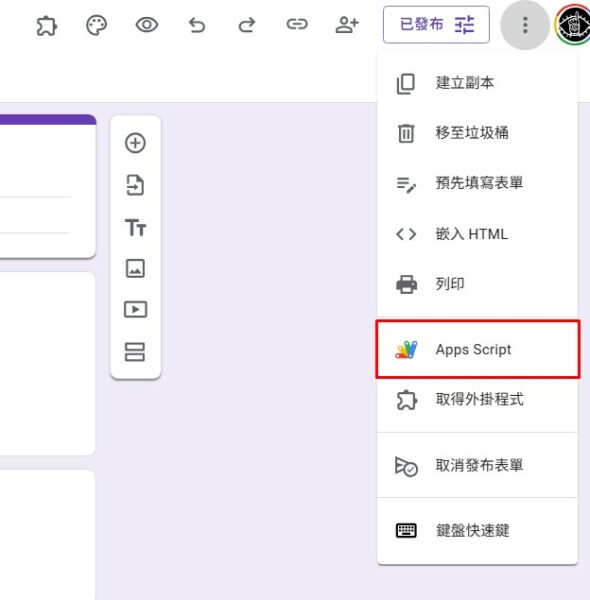
第1步,在表單的功能選單,將表單連結至Google Apps Script
第2步,編輯GAS程式碼
總共有一個主程序+6個功能函數
比較需要說明的是#21 跟模組3
由於表單只有設定填寫借用者信箱,沒有設定其他資料,例如:姓名、電話等等
如果要再增加這樣就會影響到已經建立的表單試算表
所以在#98-101,分割"借用者信箱"的文字資料,取得@之前的字串作為借用者姓名
算是個折衷處理
如果表單有這些選項的話,就不需要這樣處理
但就會有其他判斷式,來判斷項目名稱(title),再來取得回應內容,如同取得"借用者信箱"的方式
模組6是用來確認通知信是否寄出
將資料寫入表單試算表的名稱為"信件內容"的工作表
整體程式碼如下
1 2 3 4 5 6 7 8 9 10 11 12 13 14 15 16 17 18 19 20 21 22 23 24 25 26 27 28 29 30 31 32 33 34 35 36 37 38 39 40 41 42 43 44 45 46 47 48 49 50 51 52 53 54 55 56 57 58 59 60 61 62 63 64 65 66 67 68 69 70 71 72 73 74 75 76 77 78 79 80 81 82 83 84 85 86 87 88 89 90 91 92 93 94 95 96 97 98 99 100 101 102 103 104 105 106 107 108 109 110 111 112 113 114 115 116 117 118 119 120 121 122 123 124 125 126 127 128 129 130 131 132 133 134 135 136 137 138 139 140 141 142 143 144 145 146 147 148 149 150 151 152 153 154 155 156 157 158 159 160 161 162 163 164 165 166 167 168 169 170 171 172 173 174 175 176 177 178 179 180 181 182 183 184 185 186 187 188 189 190 191 192 193 194 195 196 |
/**
* 主要函式:處理表單提交並寄送確認郵件。
* @param {GoogleAppsScript.Events.FormsOnFormSubmit} e 觸發事件物件,包含表單回應資訊。
*/
function sendmail_44(e) {
// 1. 鎖定機制:確保單一執行
const lock = getScriptLock(15000);
if (!lock) return; // 如果無法取得鎖,則退出
try {
// 2. 取得表單回應
const formResponse = getLastFormResponse();
if (!formResponse) {
Logger.log("無法取得表單回應。");
return;
}
const itemResponses = formResponse.getItemResponses();
// 3. 建立郵件內容
const { htmlBody, userName ,userEmail} = createEmailContent(itemResponses);
// 4. 建立 PDF 附件
let pdfFile = null;
try {
pdfFile = createPdfAttachment(htmlBody, userName);
} catch (pdfError) {
Logger.log("建立 PDF 發生錯誤: %s", pdfError.toString());
// 即使 PDF 失敗,仍嘗試寄送 Email
}
// 5. 寄送郵件
sendConfirmationEmail(userEmail, htmlBody, pdfFile);
// 6. 記錄到試算表
const spreadsheetId = "*************************************"; // 請替換為您的實際 ID //https://docs.google.com/spreadsheets/d/*************************************/
const sheetName = "信件內容";
logToSpreadsheet(spreadsheetId, sheetName, userEmail, userName, htmlBody);
} catch (error) {
Logger.log("主要執行發生錯誤: %s", error.toString());
} finally {
// 釋放鎖定
lock.releaseLock();
}
}
/**
* 模組 1: 處理腳本鎖定。
* @param {number} timeoutMillis 鎖定等待時間 (毫秒)。
* @returns {GoogleAppsScript.Lock.Lock | null} 腳本鎖物件或 null (如果失敗)。
*/
function getScriptLock(timeoutMillis) {
const lock = LockService.getScriptLock();
try {
lock.waitLock(timeoutMillis);
return lock;
} catch (e) {
Logger.log("無法取得鎖定: %s", e.toString());
return null;
}
}
/**
* 模組 2: 取得表單的最後一筆回應。
* @returns {GoogleAppsScript.Forms.FormResponse | null} 最後一個 FormResponse 物件。
*/
function getLastFormResponse() {
const form = FormApp.getActiveForm();
const formResponses = form.getResponses();
const lastIndex = formResponses.length - 1;
if (lastIndex < 0) {
return null;
}
return formResponses[lastIndex];
}
/**
* 模組 3: 根據表單回應建立 HTML 郵件內容。
* @param {GoogleAppsScript.Forms.ItemResponse[]} itemResponses 表單問題和回應的陣列。
* @returns {{htmlBody: string, userName: string, userEmail: string}} 包含 HTML 內容和使用者姓名、信箱的物件。
*/
function createEmailContent(itemResponses) {
let userName = "借用者";
let userEmail="";
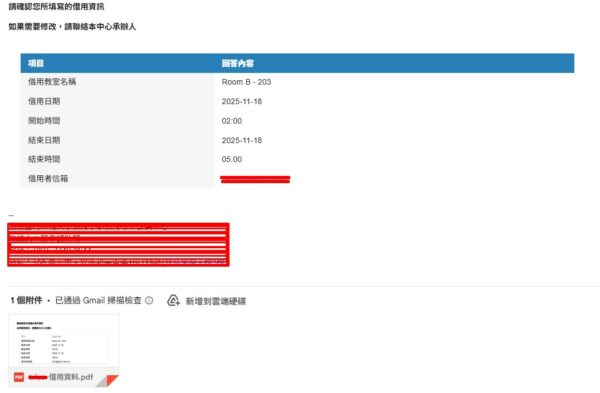
let answerHtml = '<p><strong>請確認您所填寫的借用資訊</strong></p><p><strong>如果需要修改,請聯絡本中心承辦人</strong></p>';
answerHtml += '<div class="wrapper" style="padding: 20px;max-width: 900px;">';
answerHtml += '<div class="table" style="width: 100%;box-shadow: 0 1px 3px rgba(0, 0, 0, 0.2);display: table;">';
answerHtml += '<div class="row header blue" style="display: table-row;background: #2980b9;font-weight: 900;color: #ffffff;"><div class="cell" style="padding: 6px 12px;display: table-cell;width: 35%">項目</div><div class="cell" style="padding: 6px 12px;display: table-cell;">回答內容</div></div>';
for (const itemResponse of itemResponses) {
const title = itemResponse.getItem().getTitle().trim();
Logger.log(title);
const response = itemResponse.getResponse();
if (title == "借用者信箱") {
userEmail = response;
userName = response.split("@")[0];
}
// 串接內容
answerHtml += '<div class="row" style="display: table-row;"><div class="cell" style="padding: 6px 12px;display: table-cell;background: #f6f6f6;">' + title + '</div><div class="cell" style="padding: 6px 12px;display: table-cell;">' + response + '</div></div>';
}
answerHtml += '</div></div>';
answerHtml += '<p>--<br>XXXXXXXXXXXXX中心<br />聯絡人:XXX助理<br />電話:(02)1111-2222<br />地址:106 臺北市大安區XXXXXX</p>';
const htmlBody = HtmlService.createHtmlOutput(answerHtml).getContent();
return { htmlBody, userName ,userEmail};
}
/**
* 模組 4: 將 HTML 內容轉換為 PDF 附件,並暫時儲存在 Drive。
* @param {string} htmlText 包含報名資訊的 HTML 內容。
* @param {string} userName 使用者姓名,用於 PDF 檔名。
* @returns {GoogleAppsScript.Drive.File} 建立的 PDF 檔案物件。
*/
function createPdfAttachment(htmlText, userName) {
const blob = Utilities.newBlob(htmlText, "text/html", "temp.html");
const pdfBlob = blob.getAs("application/pdf");
const pdfFile = DriveApp.createFile(pdfBlob).setName(userName + "-借用資料.pdf");
Logger.log("PDF 檔案已建立: %s", pdfFile.getDownloadUrl());
return pdfFile;
}
/**
* 模組 5: 寄送確認電子郵件。
* @param {string | undefined} emailTo 收件人電子郵件地址。
* @param {string} htmlBody 郵件的 HTML 內容。
* @param {GoogleAppsScript.Drive.File | null} pdfFile PDF 附件檔案物件 (如果存在)。
*/
function sendConfirmationEmail(emailTo, htmlBody, pdfFile) {
if (!emailTo) {
Logger.log("收件人電子郵件地址無效,跳過寄信。");
// 即使沒有 Email,也執行 PDF 檔案清理
if (pdfFile) {
DriveApp.getFileById(pdfFile.getId()).setTrashed(true);
}
return;
}
const subject = "場地借用-申請資料";
const options = {
htmlBody: htmlBody,
name: "XXXXXX-系統自動回覆信件",
replyTo: "abc@ntnu.edu.tw",
cc: "abc@ntnu.edu.tw",
attachments: pdfFile ? [pdfFile.getBlob()] : [] // 如果有 PDF 才加入附件
};
try {
GmailApp.sendEmail(emailTo, subject, "", options);
Logger.log("郵件已成功寄給: %s", emailTo);
} catch (e) {
Logger.log("寄送郵件發生錯誤: %s", e.toString());
} finally {
// 寄出信件後,刪除暫存的 PDF
if (pdfFile) {
DriveApp.getFileById(pdfFile.getId()).setTrashed(true);
Logger.log("PDF 檔案已刪除。");
}
}
}
/**
* 模組 6: 將寄件資訊寫入試算表。
* @param {string} ssId 試算表的 ID。
* @param {string} sheetName 工作表的名稱。
* @param {string | undefined} emailTo 收件人電子郵件地址。
* @param {string} userName 使用者姓名。
* @param {string} answerHtml 郵件的 HTML 內容。
*/
function logToSpreadsheet(ssId, sheetName, emailTo, userName, answerHtml) {
try {
const ss = SpreadsheetApp.openById(ssId);
const sOne = ss.getSheetByName(sheetName);
if (!sOne) {
Logger.log("找不到工作表: %s", sheetName);
return;
}
const dataRow = sOne.getLastRow();
const dataColumn = sOne.getLastColumn() || 3; // 至少確保有 4 欄
const dataVlues = [[emailTo || "N/A", userName, answerHtml]];
// 寫入下一行
sOne.getRange(dataRow + 1, 1, 1, dataVlues[0].length).setValues(dataVlues);
Logger.log("資料已寫入試算表。");
} catch (e) {
Logger.log("寫入試算表發生錯誤: %s", e.toString());
}
}
|
AI重新整理過的程式碼,相較之下
有很完整的程式備註與錯誤處理程序
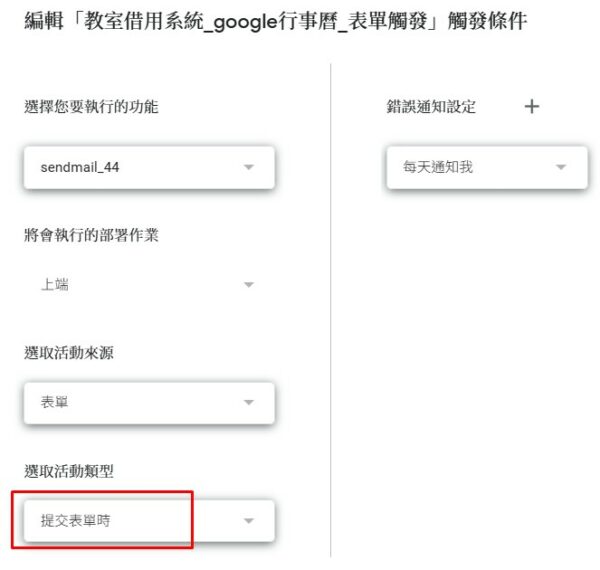
第3步,建立觸發行為
當表單有新回應的時候,觸發程式
這樣借用人送出表單之後,就會收到通知信跟附件