1.文章內圖檔增加a標籤
#1 each、#2 wrap
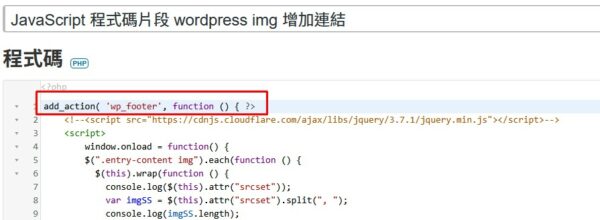
利用each函數逐一處理在文章Div內的圖檔
選定的圖檔用wrap函數,將圖檔包在新增的a標籤內
#4判斷式
後來的程式碼經過調整,因為非jpeg格式的圖檔,網站後端不會在img標籤內增加srcset屬性值
原本程式碼會因為"undefined",split不能執行,導致程式碼中斷
所以用判斷式來處理 非jpeg格式的圖檔
#8判斷式
因為如果圖檔小於300px,srcset裡面就會少於6種尺寸
排列的順序也不同,而src屬性值就是網頁顯示圖檔的網址
所以判斷少於6種尺寸就直接取src的屬性值
1 2 3 4 5 6 7 8 9 10 11 12 13 14 15 16 17 18 19 20 21 22 23 |
$(".entry-content img").each(function () { $(this).wrap(function () { //console.log($(this).attr("srcset")); if (typeof $(this).attr("srcset") !== "undefined") { var imgSS = $(this).attr("srcset").split(", "); //console.log(imgSS.length); // imgSS.length >=6 if (imgSS.length >= 6) { var imgTarget = imgSS.length - 1; var imgSSone = imgSS[imgTarget]; //console.log(imgSSone); var imgUrlOne = imgSSone.split(" ")[0]; //console.log(imgUrlOne); //console.log('<a href="' + $(this).attr('src') + '" class="oceanwp-lightbox" />'); return '<a href="' + imgUrlOne + '" class="oceanwp-lightbox" />'; } else { // imgSS.length <6 //console.log($(this).attr("src")); return '<a href="' + $(this).attr("src") + '" class="oceanwp-lightbox" />'; } } }); }); |
2.a標籤觸發Magnific-Popup
#1判斷式
避免在非文章頁面找不到.oceanwp-lightbox而導致程式碼中斷
#2-#16 MagnificPopup設定
基本是修改網站上的Single image lightbox第三種範例並參考Zoom-gallery範例增加gallery的設定值
1 2 3 4 5 6 7 8 9 10 11 12 13 14 15 16 |
if($(".oceanwp-lightbox").length>0){ $(".oceanwp-lightbox").magnificPopup({ type: "image", mainClass: "mfp-with-zoom", gallery: { enabled: true }, zoom: { enabled: !0, duration: 300, easing: "ease-in-out", opener: function(e) { return e.is("img") ? e : e.find("img") } } });} |
3.透過”程式碼片段”這個外掛加入以上程式碼
將程式碼需要使用的Jquery引入網頁的head

將程式碼加在網頁的footer